The Complete Guide to Solar Power for Cabins
Affiliate disclosure: This page contains paid links to Amazon and eBay. If you buy through them, we may earn a commission at no extra cost to you. As an Amazon Associate I earn from qualifying purchases.
Powering a cabin with solar used to be a hobbyist project — mismatched panels, golf-cart batteries, and a lot of trial and error. Today it's a mature, reliable way to run a remote property without ever calling the utility company. Lithium batteries last a decade, MPPT charge controllers squeeze usable power out of cloudy days, and complete pre-matched kits take most of the guesswork out of the build.
This guide covers the entire picture: how a cabin solar system actually works, how to figure out what size you need, what each component does, what a realistic budget tier looks like, and the mistakes that cost first-time off-gridders the most money. Whether you're powering a weekend hunting shack or a full-time homestead, the physics and the buying logic are the same — only the scale changes.
How a Cabin Solar System Works
Every off-grid solar setup — from a single panel on a shed to a whole-home array — has the same four core components working in a chain:
- Solar panels convert sunlight into DC electricity. Output rises and falls with sun intensity, angle, and shading.
- The charge controller sits between the panels and the battery. It regulates voltage and current so the battery charges safely and efficiently instead of getting cooked.
- The battery bank stores energy for nighttime and cloudy stretches. This is where your cabin's real capacity lives — panels make power, batteries hold it.
- The inverter converts stored DC power into 120V AC, the household current your fridge, lights, and outlets expect.
Some loads can skip the inverter entirely. 12V LED lighting, 12V water pumps, and DC fridges run straight off the battery through a fuse block, which avoids inverter conversion losses. Many efficient cabins run a hybrid: DC for always-on basics, AC through the inverter for everything else.
Step 1: Add Up Your Loads Before You Buy Anything
The single most common mistake in cabin solar is buying panels first and doing the math later. Your system size is dictated by your daily energy consumption in watt-hours (Wh), so start by listing everything you'll run, its wattage, and hours of daily use:
| Load | Typical Watts | Hours/Day | Daily Wh |
|---|---|---|---|
| LED lights (6 bulbs) | 54 | 5 | 270 |
| 12V compressor fridge | 45 avg | 24 | 1,080 |
| Phone + laptop charging | 65 | 3 | 195 |
| Water pump | 60 | 0.5 | 30 |
| Fan or small electronics | 40 | 4 | 160 |
| Total | ~1,735 Wh/day |
That table describes a fairly comfortable small cabin. A bare-bones weekend shack (lights, charging, a fan) might use 400–600Wh a day. A full-time cabin with a full-size fridge, well pump, and washing machine can easily hit 4,000–8,000Wh. Do your own version of this table honestly — the system you buy is only as good as this estimate.
Step 2: Size the Panel Array
Once you know your daily watt-hours, sizing the array is straightforward. Divide daily consumption by your location's peak sun hours — the equivalent hours of full-intensity sun per day. Most of the continental US gets roughly 4–6 peak sun hours in summer and 2–4 in winter, depending on latitude and climate.
Using the 1,735Wh example above with a conservative 4 peak sun hours: 1,735 ÷ 4 = ~434W of panels needed in ideal conditions. But real systems lose 20–30% to wiring resistance, controller conversion, battery charging inefficiency, dust, and imperfect panel angle. Multiply by 1.3 as a rule of thumb: ~565W. Round up to the next standard array size — in this case, 600W of panels.
If you use the cabin in winter, size against winter sun hours, not the summer average. A system that's generous in July can be starving in January, when days are short, the sun is low, and snow shades the array. This is the number one reason four-season cabins end up adding a backup generator.
- Weekend/seasonal cabin, light loads: 200–400W is usually plenty.
- Part-time cabin with a fridge: 400–800W.
- Full-time small cabin: 800–1,600W.
- Full-time homestead with well pump and appliances: 2,000W and up.
Step 3: Size the Battery Bank
Your battery bank needs to carry the cabin from sunset to the next productive solar day — and ideally through a cloudy day or two. Start with your daily consumption and decide how many days of autonomy you want:
Battery capacity (Wh) = daily consumption × days of autonomy ÷ usable depth of discharge.
Lithium iron phosphate (LiFePO4) batteries can be safely discharged to 80–100% of rated capacity; lead-acid AGM should only be run to about 50%. For the 1,735Wh cabin wanting 1.5 days of autonomy on lithium: 1,735 × 1.5 ÷ 0.9 ≈ 2,890Wh — call it a 2.5–3kWh lithium bank, or roughly one 200Ah 12V battery plus margin.
Lithium has effectively won the cabin battery argument for most builders: two to three times the usable capacity per rated amp-hour, 3,000–5,000+ charge cycles versus 400–800 for AGM, half the weight, and no maintenance. AGM still makes sense for tight budgets and for unheated spaces where sub-freezing charging is a concern — more on that in our cold-weather guide.
Step 4: Choose the Charge Controller and Inverter
The charge controller must match your array's voltage and current. MPPT (Maximum Power Point Tracking) controllers convert excess panel voltage into charging current and harvest 20–30% more energy than cheaper PWM controllers, especially in cold weather and partial sun. For any array over about 200W, MPPT is worth it. Size the controller so your array's output current fits within its amp rating with ~25% headroom — a 40A MPPT comfortably handles around 500W on a 12V battery bank.
The inverter is sized against your largest simultaneous AC load, not your daily consumption. Add up what might run at once — fridge compressor start-up, microwave, coffee maker — and choose a pure sine wave inverter rated above that with surge capacity to spare. Common cabin sizes: 1,000W for basics, 2,000W for a comfortable small cabin, 3,000W+ for full-time living with bigger appliances. Always choose pure sine wave; modified sine wave inverters can damage compressor motors and electronics.
Complete Kits vs Building From Components
You can piece together panels, controller, battery, and inverter yourself — or buy a pre-matched kit where the manufacturer has done the compatibility engineering. For first systems, kits win on sanity: correct wire gauges, matched voltages, one warranty conversation, and instructions written for the exact hardware in the box.
Component-by-component builds make sense when you have unusual requirements, want to mix best-in-class parts, or are expanding an existing system. Expect to spend real time on voltage matching, fusing, and wire sizing. Our kit vs custom build comparison walks the trade-offs in detail.
Recommended Starting Points
These are the systems we point cabin owners toward most often, from weekend shack to full-time build:
Renogy 400W Premium Solar Kit
Four 100W monocrystalline panels with a 40A MPPT controller and Bluetooth monitoring. Enough daily production for lights, a 12V fridge, a fan, and device charging at a weekend or part-time cabin — with room to add a battery bank of your choosing.
Rich Solar 800W Off-Grid Kit
An eight-panel, 800W array with a 60A MPPT controller for serious off-grid living. Paired with a healthy lithium bank, it comfortably runs a full-size fridge, lights, water pump, and electronics year-round in most of the US.
And for cabins that want the whole problem solved in one shipment — array, lithium storage, and inverter-charger pre-matched at whole-home scale:
Renogy Complete Off-Grid Cabin Solution
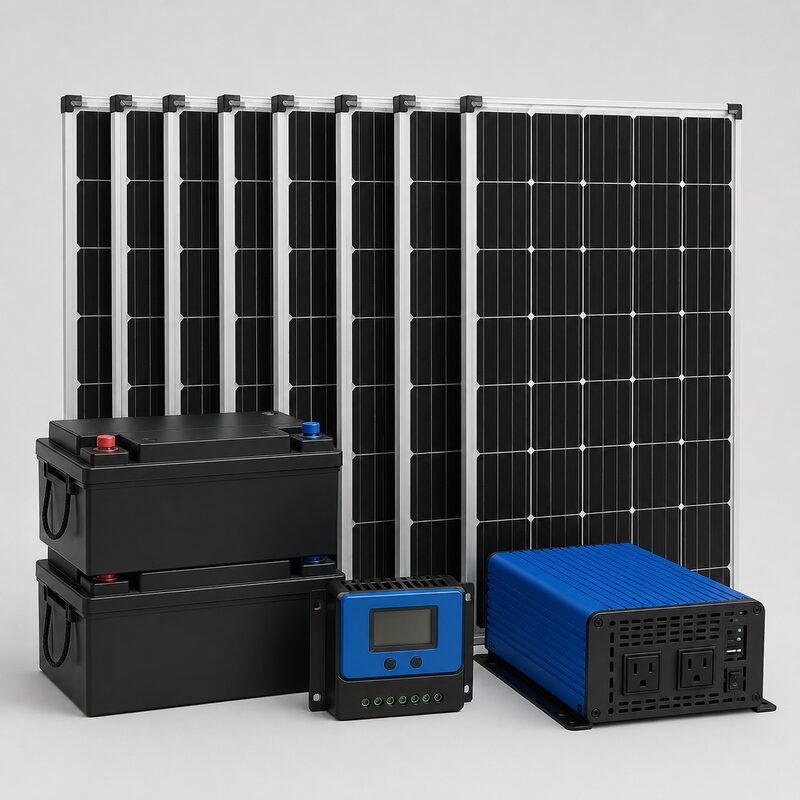
A serious all-in-one package for full-time cabins and workshops — high-efficiency N-type panels, an expandable LiFePO4 battery bank rated at 20.48kWh, and a 3,500W pure sine wave inverter-charger, shipped as one pre-matched kit so nothing gets mismatched.
See Live Price at Renogy →Direct from Renogy — we may earn a commission at no extra cost to you.
Mounting, Wiring, and Installation Basics
Most cabin arrays go on the roof (best sun exposure, out of the way, harder for theft) or on a ground mount (easier snow clearing, adjustable tilt, simpler maintenance). Face panels true south in the northern hemisphere, tilted at roughly your latitude — steeper for winter bias, shallower for summer.
Wiring runs deserve as much attention as the panels themselves. Undersized cable between panels and controller, or controller and battery, wastes power as heat and creates a fire risk. Keep the controller close to the battery bank, use the wire gauge your controller manual specifies, and fuse every positive run. Our cabin wiring guide covers the full panel-to-inverter chain step by step, and the roof installation guide covers mounting and sealing.
What It Costs: Budget Tiers
We don't quote fixed prices — hardware prices move constantly — but cabin solar falls into three clear budget tiers:
- $ — Starter (weekend cabin): 100–400W of panels, PWM or small MPPT controller, one battery, and a compact inverter. Lights, charging, a fan, maybe a small 12V fridge.
- $$ — Comfortable (part-time to modest full-time): 400–800W array, 40–60A MPPT, 2–5kWh of lithium storage, 2,000W pure sine inverter. Runs a real fridge and normal cabin life.
- $$$ — Whole-cabin (full-time/homestead): 1,500W+ array, large MPPT or all-in-one inverter-charger, 10–20kWh lithium bank, 3,000W+ output. Runs a household, often with generator backup for deep winter.
The best money-saver isn't cheaper hardware — it's reducing loads. Every watt-hour you move to propane, wood, or efficiency (LED everything, a DC fridge, insulation) shrinks all four components at once.
The Five Mistakes That Cost Cabin Owners the Most
- Sizing to summer. Winter production can be a third of July's. If you use the cabin year-round, do the math for December.
- Cheap PWM controllers on big arrays. The savings vanish into 20–30% harvest losses. MPPT pays for itself.
- Undersized battery banks. Panels without storage means power all afternoon and darkness by 9pm. Storage, not panel wattage, sets your quality of life.
- Modified sine wave inverters. They hum, they overheat motors, and they shorten appliance life. Pure sine wave only.
- No expansion plan. Loads always grow. Buy a controller and inverter with headroom, and pick a battery chemistry you can parallel later.
From here, dig into the specific guides: choosing a kit, panel count math, and our small-cabin kit picks.
Living With the System: A Day in the Life
It helps to understand what an off-grid cabin day actually feels like, because the rhythm shapes how you should size and use the system. Morning starts with the bank at its lowest point — the fridge ran all night, the inverter idled, maybe a late movie drew the bank down further. As the sun climbs, the controller ramps from a trickle to full charge current, and by late morning on a clear day the bank is climbing fast. Solar noon through mid-afternoon is surplus season: the bank approaches full and the controller starts throttling back because there's nowhere to put the power. Experienced off-gridders schedule their heavy loads here — laundry, water pumping to a storage tank, tool charging, vacuuming — spending watt-hours that would otherwise go unharvested. Evening runs the cabin off storage, and the cycle repeats.
That rhythm has two practical lessons. First, opportunistic load timing effectively enlarges your system for free: a cabin that runs its big loads at solar noon needs less storage than one that runs them at 8pm. Second, the morning battery reading is your system's honest report card. Track it for a few weeks and you'll know your real margin better than any calculator can predict it.
Monitoring: The Cheap Component That Prevents Expensive Surprises
A battery monitor with a shunt — which counts amp-hours in and out rather than guessing from voltage — is the single most clarifying addition to a cabin system. Lithium's flat voltage curve makes voltage-based state-of-charge guesses nearly useless; a shunt monitor tells you the truth in percent and watt-hours, shows you exactly what each appliance draws the moment you switch it on, and turns vague anxiety about the bank into a number on a screen. Bluetooth controller apps add production history: a month of daily harvest data is how you notice a new shading problem, a failing connection, or a panel that quietly stopped contributing.
Between the shunt and the controller app, you can audit the whole energy budget from the couch — production, consumption, and margin — which is exactly the information every upgrade decision needs.
Safety, Codes, and Insurance
Off-grid doesn't mean off the hook. Even where no permit is required, the National Electrical Code's articles on solar and storage systems encode hard-won lessons about fusing, disconnects, wire sizing, and battery placement — building to that standard costs little and protects everything. Three habits cover most of the risk: a fuse or breaker on every positive conductor sized to its wire, clearly labeled disconnects for the array, the bank, and the inverter, and batteries in a ventilated, protected space away from ignition sources. If your cabin is insured, tell the insurer about the system; an undisclosed power plant is the kind of surprise that complicates claims, while a disclosed, tidily-built one rarely raises premiums for a cabin that previously had no power at all.
Lightning deserves a mention for exposed sites: bond the panel frames and rails to ground, and add an inexpensive DC surge protection device at the controller's PV input. Ridge-top arrays collect strikes' induced surges even from distant hits, and the SPD is sacrificial protection for the most expensive electronics on the wall.
Frequently Asked Questions
How much solar power does a typical cabin need?
A weekend cabin running lights, device charging, and a fan typically needs 200–400W of panels with a modest battery. A part-time cabin with a fridge lands around 400–800W, and full-time cabins usually need 800W to 2,000W+ depending on appliances. The honest answer always starts with adding up your daily watt-hour consumption first.
Can solar power a cabin year-round?
Yes, if the system is sized for winter production rather than summer. Winter delivers fewer and weaker sun hours, so four-season cabins either oversize the array and battery bank or pair solar with a small backup generator for extended cloudy stretches.
Do I need permits for cabin solar?
Off-grid solar on a private cabin is unregulated in many rural counties, but some jurisdictions require electrical permits or inspections, especially for permanent structures. Check with your county building department before a large installation — rules vary widely.
Is it cheaper to buy a kit or build from components?
Kits are usually comparable in cost and dramatically simpler, since the manufacturer has matched voltages, controller sizing, and wiring. Component builds win when you have specific requirements or are expanding an existing system, but expect to invest time in compatibility research.
What lasts longest in a cabin solar system?
Panels — quality monocrystalline panels carry 25-year output warranties and often outlive them. Lithium batteries typically deliver 10+ years of daily cycling. Inverters and charge controllers are the components most likely to be replaced first, usually after 8–15 years.
Should my cabin battery bank be 12V, 24V, or 48V?
Small systems under about 1,000W of panels are fine at 12V and enjoy the widest accessory ecosystem. Between 1,000W and 2,000W, 24V reduces wire size and losses. Above 2,000W or with big inverters, 48V is the standard for efficiency and safety at high power.